INTERMEDIATE BUILD
Adding to Italeri’s increasing range of 1/12 car kits, Italeri’s new-tool Lancia Delta Integrale HF was a subject rally aficionado Alan Price was keen to construct… and improve.
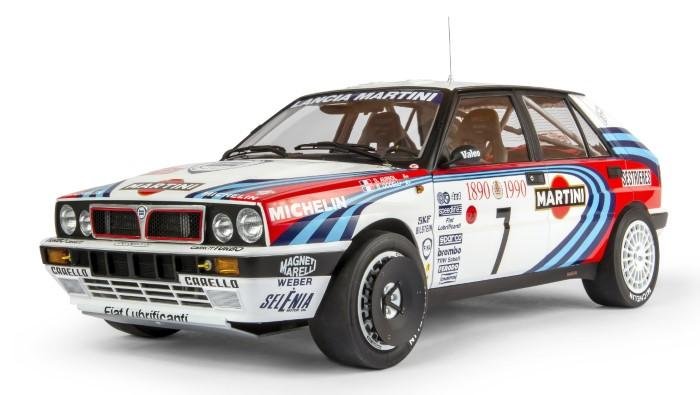
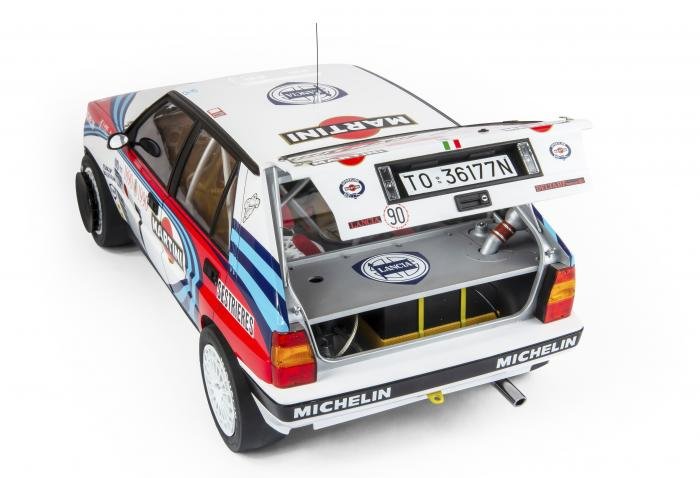
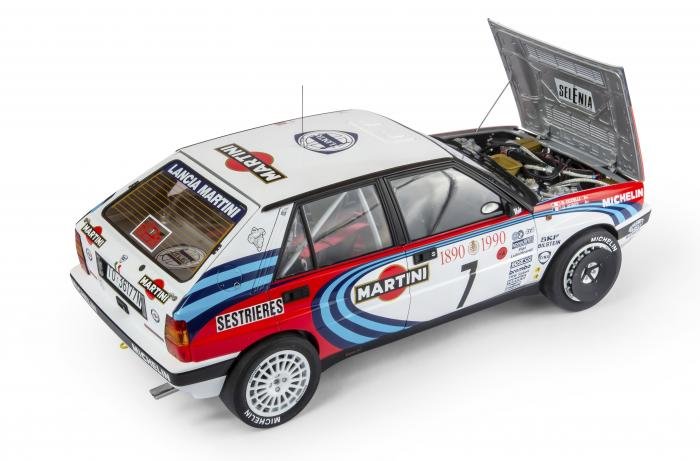
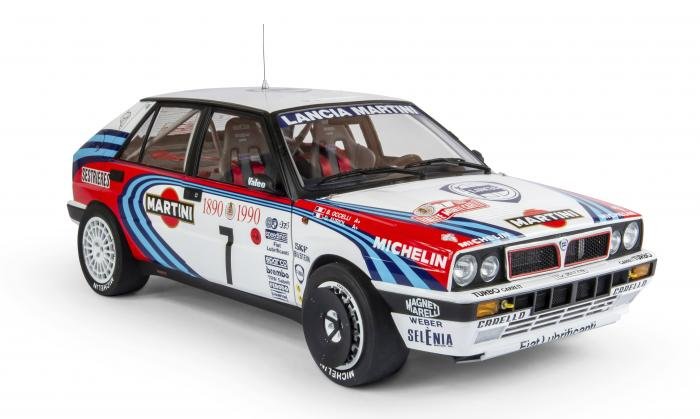
Based on the Delta production road car, the Integrale was Lancia's replacement for the Delta S4 following the cancellation of Group B rallying in 1986. The car was developed under Group A regulations with eight- and then 16-valve engines (the latter replicated here). The kit represents the cars entered in the 1990 Monte Carlo Rally, where Miki Biasion and Tiziano Silviero’s #1 finished 3rd overall while Didier Auril and Bernard Occelli won in #7.
This subject was only previously available as a Model Factory Hiro multi-media kit in 1/12. Despite Italeri’s offering being cheaper by approximately £400, it’s still expensive. Cars are popular subjects in this scale and this example, packed with detail, requires a huge box to hold all the parts. It comprises eight runners in black, white, silver and clear styrene, one chrome runner, a main bodyshell, rubber parts, one large sheet of photo-etched (PE) metal, two A4-sized Cartograf decal sheets and a bag full of tubing, wires and screws. The instruction book comprises 63 steps across 42 pages plus a separate painting guide.
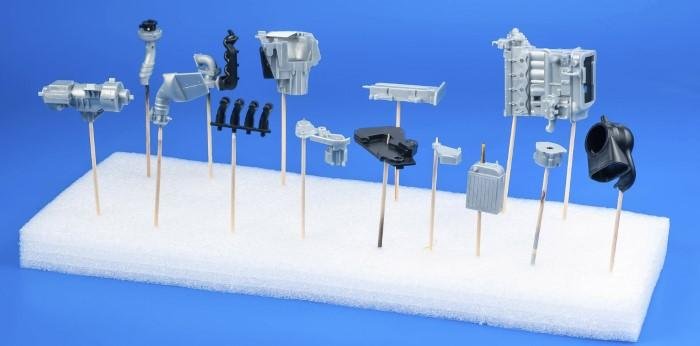
Above: After building into sub-assemblies, major engine components were prepared for priming, then painting in the appropriate colours.

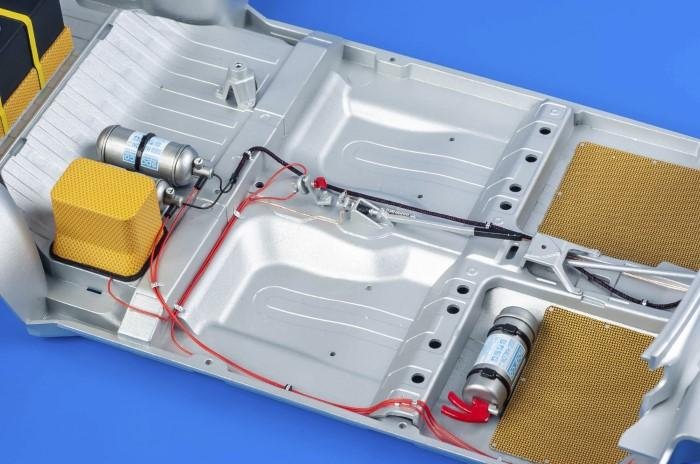
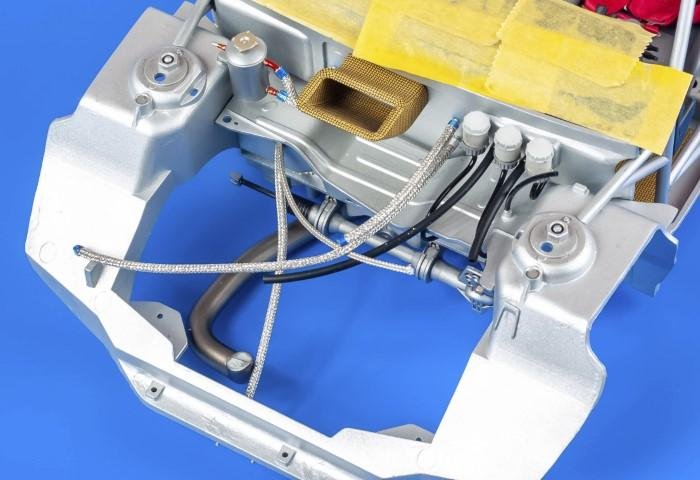
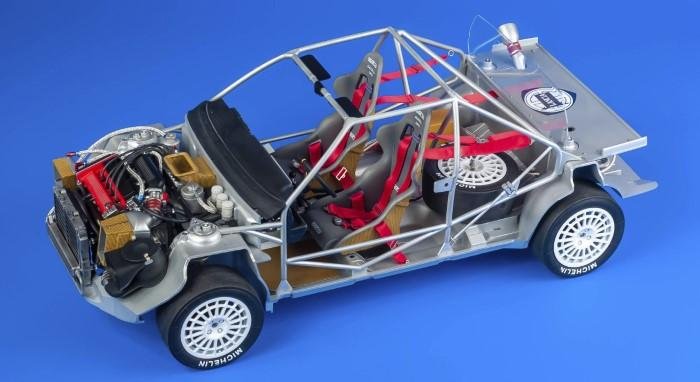
Above: The chassis builds onto one large floorpan moulding, so some minor assembly is required before the entire chassis can be painted. Additional detailing was added prior to spraying.
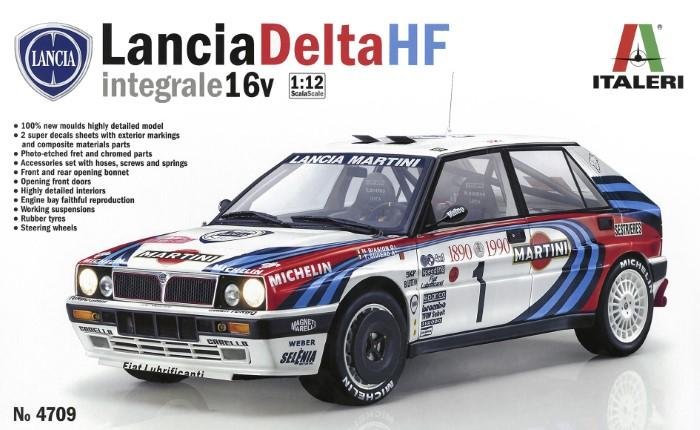
| Italeri Lancia Delta HF Integrale 16V | |
|---|---|
| By: | Italeri |
| Stock Code: | 4709 |
| Scale: | 1/12 |
| Price: | £229.95 |
| Available from: | The Hobby Company |
Parts are well moulded with no flash evident, although most had noticeable mould seams. Despite being brand-new, an ‘old feel’ was perhaps sensed because Italeri didn’t utilise slide-moulding technology, resulting in prominent ejector-pin marks. These were often in difficult to remove in places such as the inside face of the bonnet and across the engine bay bulkhead. Clear parts are excellent – the windscreen and tailgate glass in particular being very thin and clear. It was obvious from a glance at the parts and the instructions that this was going to be a long and complex project, but little did I know back in June 2022 that it would take nine months to complete!
See our prize draw in which you can win Italeri's 1/12 Bugatti Type 35B worth £174.99 (closing date September 13, 2023)
Stage one
The first problem with the kit was where to begin? It was daunting trying to work out the best way to approach the project. The instructions started with the chassis, but I opted to begin with the engine. This unit comprised numerous parts, so these were built into sub-assemblies such as the main block, gearbox and front differential. All were neatened before priming with Mr. Surfacer 1000 (www.albionhobbies.com).
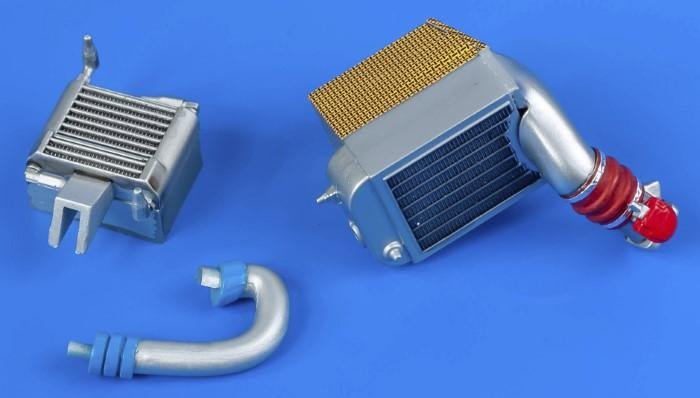
Above: Similarly, the transmission oil cooler and intercooler require careful painting plus decals for the Kevlar elements, notably the air guides.
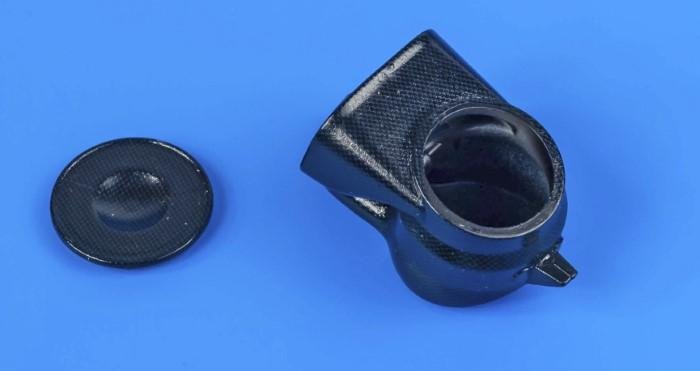
Above: No carbon fibre decals were supplied for the air box, so Tamiya items were used instead.
As with most rally cars, these Lancias were in a constant state of flux, with parts being altered, replaced and upgraded, so pinning down exact colours wasn't easy. Useful references are online, but definitive facts are hard to come by – Italeri’s call-outs generally appeared correct, but were slightly generic in places. Appropriate colours included various Alclad metallic shades for bare metal parts and Tamiya LP-5 Semi-Gloss Black (www.hobbyco.net) for black areas. The cam box cover and sump pan received LP-50 Bright Red, but careful masking was then required to paint parts black then add machined aluminium strips along the top. All then received a thin black wash to highlight detail. The exhaust manifold and turbo were over-sprayed with ALC-104 Pale Burnt Metal and ALC-113 Jet Exhaust, while nuts on the former received brass enamel.
Engine detail was improved with bolts made from 1mm plastic rod and blanking plates were used to closed the open sides to the gearbox. Once the basic engine had been assembled, hoses were added for later installation – the kit supplies various sizes of plastic and rubber tubing that were deemed inadequate. A grey hose appeared flat and too fine, so various sizes of Tamiya braided hoses were used throughout, plus some generic thin examples from the spares box. It was intended to use Top Studio resin hose joints but none could be sourced in time, so ends were wrapped with self-adhesive aluminium foil and painted clear red or blue.
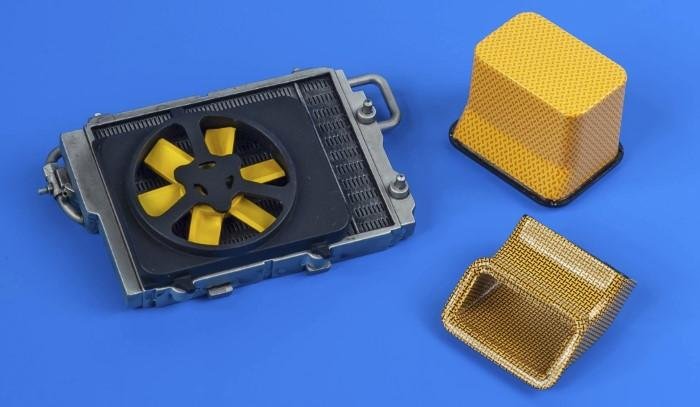
Above: The completed radiator and oil cooler assembly and the battery box and cabin air inlet were both covered in the kit’s different styles of Kevlar decals.
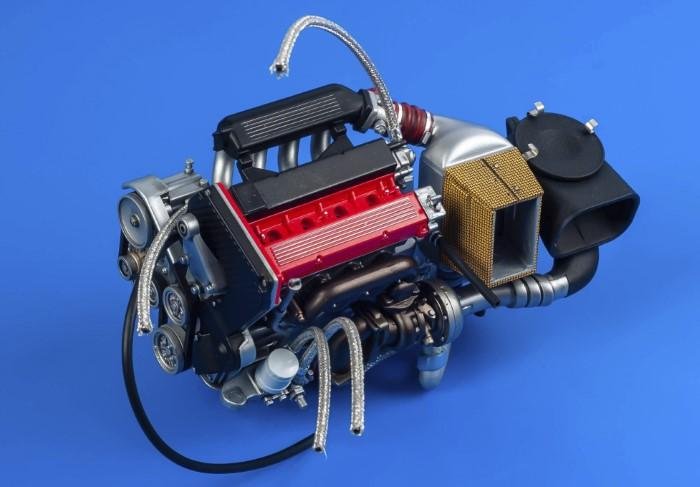
Above: Various colours are apparent in the fully assembled engine, complete with aftermarket braided hoses ready for plumbing the unit.
Above: Fitting the cockpit with missing wiring took much work; here, the fire extinguisher and power lines. Note the PE mats (right), which were hard to use.
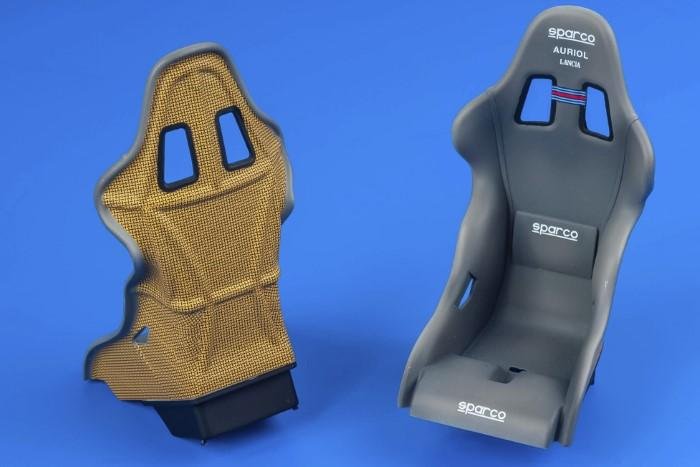
Above: The seats were painted and shaded with an airbrush, followed by a dark wash. Rear surfaces received Kevlar-pattern decals.
Checking where the hoses ran to/from the engine revealed some issues: the oil and water pipes were incomplete in places and the oil thermostat housing on the front of the powerplant – which should connect to the oil cooler – was left with no plumbing. Discovering how everything should be connected was not easy – the result is perhaps not entirely accurate, but is better than the kit’s depiction. Another problem with the engine was the total absence of any fuel pipes to connect to the inlet plenum – other than the tank there’s no propellant system, but more on this later.
The air box was carbon fibre, so this was covered with a Tamiya patterned decal. Ditto the intercooler and transmission oil cooler guides, which were formed from Kevlar and thus decorated with Italeri’s markings. Once fitted, the completed engine was set aside.
Chassis construction
The chassis builds onto one large floorpan, so the first tasks were the engine and driving/passenger compartments. For the latter, the handbrake and gearshift mountings were attached to the floor, then the entire unit was sprayed aluminium. There was no pipework or wiring supplied for the passenger compartment – in 1/12 scale, everything is visible, so much work was required to make the interior passable. Copper wire was added for the fly-off handbrake and brake bias hydraulics. Fire extinguishers were detailed with scrap plastic card straps and pressure gauges, while red wire was used for the positive line from the battery to the master switch and out to the front of the car. Cabling was added for the fire extinguisher initiator and outlet lines under the dashboard and into the engine bay.
As mentioned, the fuel system is limited to just a tank, so a swirl pot and pump were scratch-built for the boot, then connected with a supply and return hose through the navigator’s side of the car to the engine bay pressure regulator. The seats were tackled next. These were neatened, then fabric tops were airbrushed with Mr. Hobby H69 RLM Grey (www.albionhobbies.com), a reasonable match for the original colour. Seat backs were Kevlar, for which the kit provides decals, with acrylic varnish preceding application. Despite the complex shapes, the Cartograf-produced markings went on easily using Microscale setting solution and Tamiya Mark Fit Strong for more stubborn areas. A dark wash was applied to fabric areas, then the seats were finished with Mr. Paint MRP-127 Super Clear Matt Varnish.
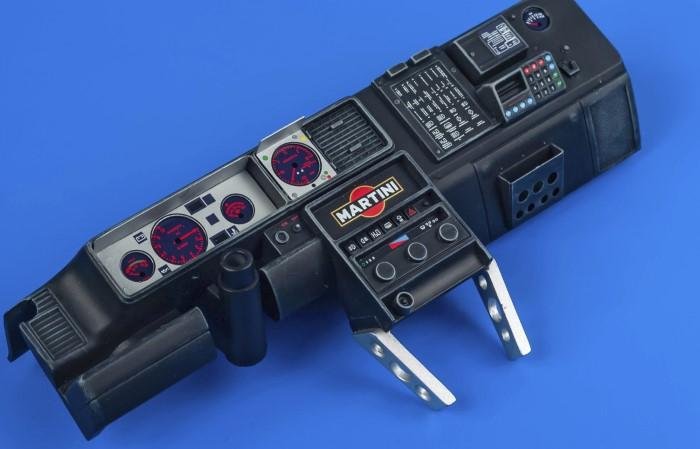
Above: Italeri’s instrument panel is very attractive once assembled and painted, though the transparent covers were discarded – note the holes drilled in the centre console supports.
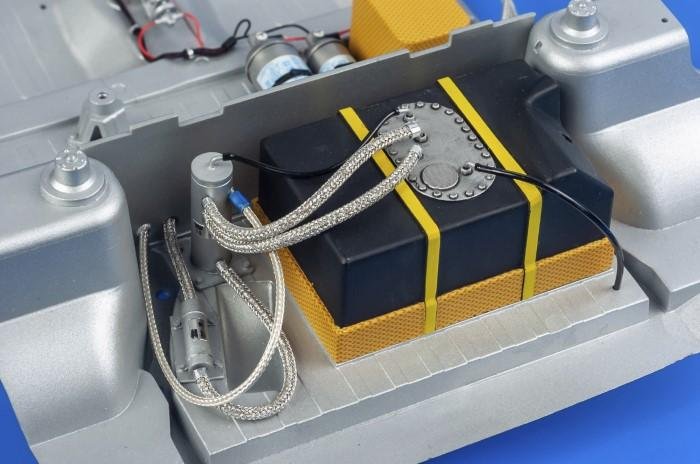
Above: Other than a fuel tank, there’s no propellant system, so all had to be scratch-built. A swirl pot (upright) and fuel pump (below to the left) were added to the boot floor.
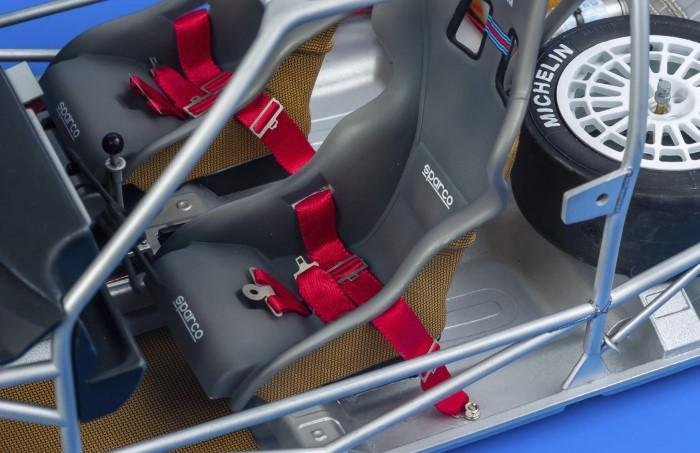
Above: Lap belts were bolted to the floor. No fittings are provided, with the suggestion being to glue them – most unsatisfactory in this scale.
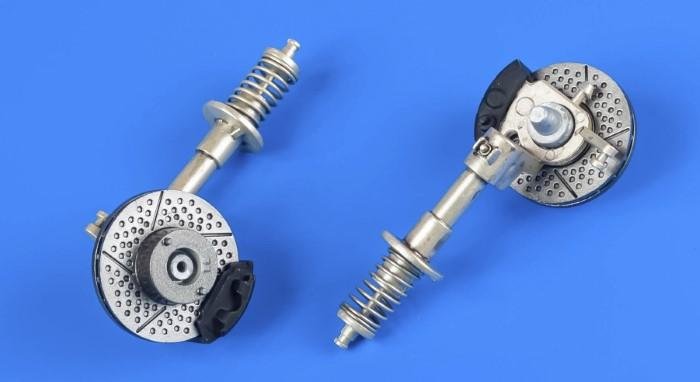
Above: Suspension dampers appear similar all round (the front examples are shown). All were painted with LP-62 Titanium Gold to simulate cadmium plating.
The dashboard required some alteration. Two braces run from the base of the centre console to the transmission tunnel; Italeri moulded these as being solid, but each is really a pressing with three large holes. After marking the position, openings were drilled and the edges rounded to resemble the shapes. After being airbrushed in aluminium, the braces were masked so the rest of the dashboard could receive black. Light grey dry-brushing was next, followed by a black wash and matt varnish. Instruments decals are provided to sit behind a PE plate that also has a decal for its face. When it came to applying clear instrument covers over the dials, the two main covers for the speedometer and tachometer were too small, leaving a gap between them and the PE. This also meant the black edges of the covers obscured the scales around the dials. Gloss varnish was used to replicate glass instead, omitting the covers. The completed panel was attached at this point.
Belt work
The kit comes with a hank of red satin ribbon and PE buckles for the seatbelts. Testing the ribbon in the metal parts, it was very difficult to get it through the tight fittings. Measuring revealed it was 7mm, which scaled up to 84mm, whereas seatbelts of the period were 75mm. So some 6mm red ribbon was found (which scaled up to 72mm) and fitted the kit’s PE more neatly. Note that the ends carrying the quick-release fittings require folding in on themselves to fit the buckle – this is correct per the real item but isn't explained in the instructions. Dimensions given for each strap were somewhat unreliable, so were measured and cut to fit the seats and roll cage in position. The kit doesn’t supply narrow belt material for the crotch straps, so 3mm ribbon was used. The best adhesive for the job was GS Hypo jewellers’ glue – this doesn’t soak into the fabric and leave dark patches as cyanoacrylate would.
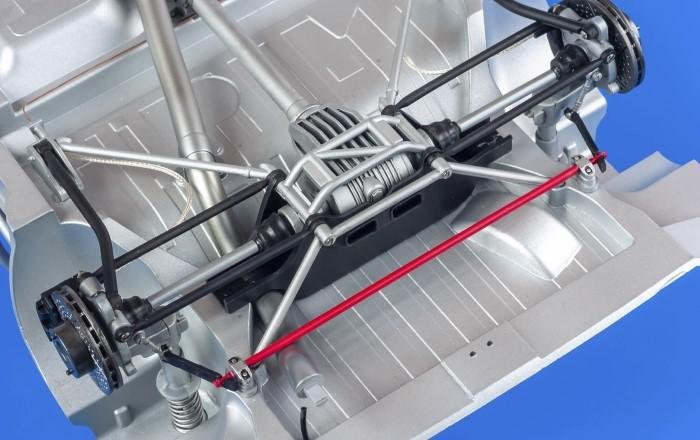
Above: The rear suspension and transmission forms a complex unit with several moving parts. Brake lines were added, initially inaccurately.
Above: Before the engine could be fitted, several hoses and fittings needed attaching. The tape on the dashboard is to protect the matt finish from getting marked.
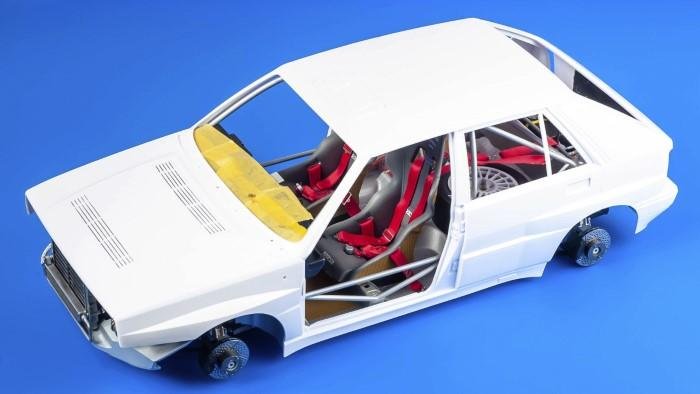
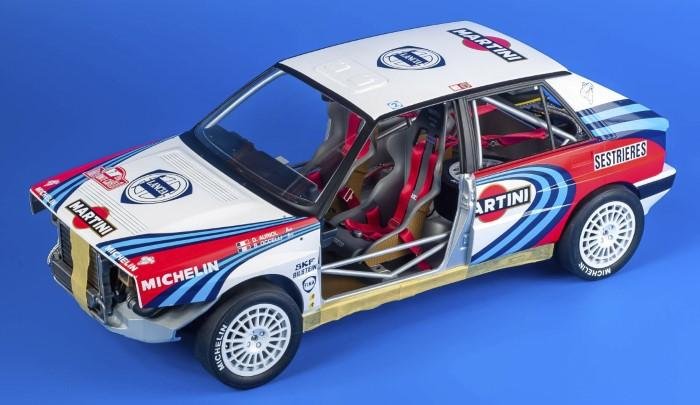
Above: With the chassis complete, the body was dry-fitted to ensure everything aligned correctly.
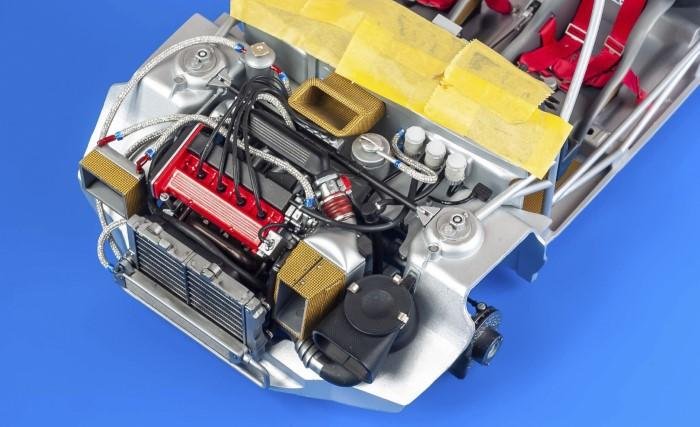
Above: Much is crammed into the engine bay; the only alteration required for the bonnet to fit was to move the plug leads to the left of the fuel pressure regulator.
In terms of fixing, the instructions show the harnesses being glued just vaguely to the roll cage and floor – an unsatisfactory arrangement. Instead, the floor was drilled and the lap restraints bolted, then fittings were formed from copper wire to attach the shoulder straps to the tail traps and the roll cage. The kit-supplied Sparco decals were not used as waterslide transfers and fabric are not a good match, whereas Model Factory Hiro sets contain self-adhesive labels so can be applied at a later date. Although assembled to aid the seatbelt process, the roll cage received stretched styrene weld detail on areas that would be visible through open doors. Once sprayed silver, a dark wash highlighted this added relief. The seats, seatbelts and roll cage were then set on the chassis. The spare wheel had to be fitted at this point and, as there is no specific item provided, mounting bolts were in situ, so had to be drilled prior to painting. Tyres had a prominent mould seam, so coarse emery paper was used to remove this and leave realistic surfaces.
Under the bonnet
Next, the engine bay had to be ‘fitted out’ before mounting the powerplant. As you might expect, this was fairly detailed, with brake master cylinders and fluid reservoirs plus parts for the electronic ignition and header tanks for water and oil. All needed pipework and/or cabling to connect to the engine, while fuel hoses were also in position, having been pushed through the bulkhead. Several evenings were taken preparing and painting parts, then assembling suitable pipes and cables before all was ready for a test-fit to see if the fittings aligned and the engine seated correctly. One last job remained: the transmission and suspension. With the cockpit safely protected by the roll cage, the model could be flipped for work on the running gear. The first job to tackle was the exhaust as this runs over the rear suspension – it was painted aluminium then carefully shaded with ALC-113 Jet Exhaust for a used appearance.
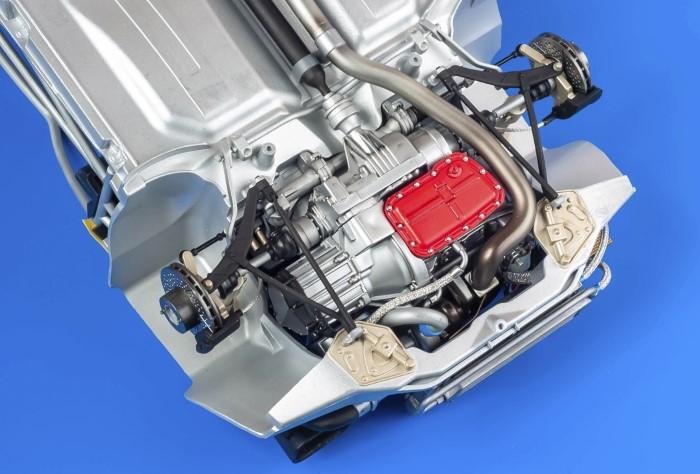
Above: Underneath the engine, the exhaust and suspension elements were attached without issue, while hydraulic hoses were added to each brake calliper.
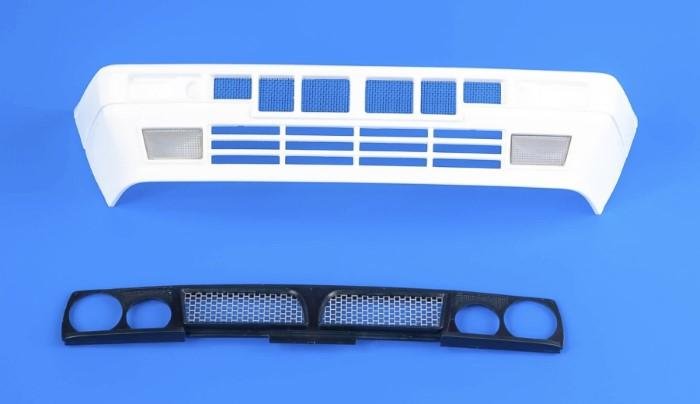
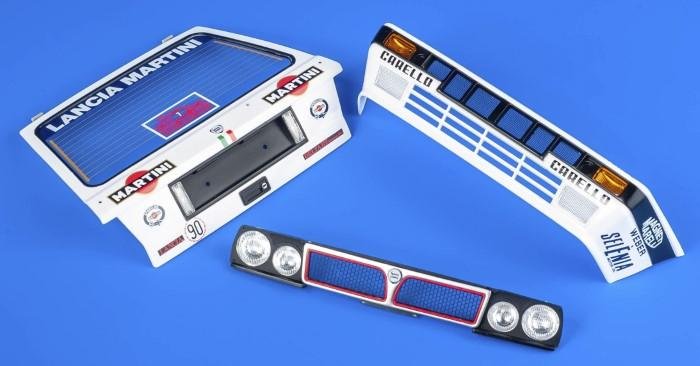
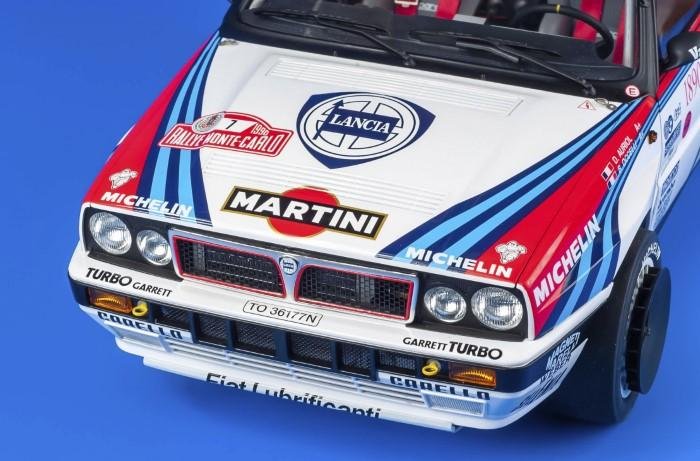
Above: Several grilles must be attached to the front bumper. PE was used for the lower example, while kit-supplied mesh was fitted to the upper piece.

Above: Once the body was painted white, red areas were masked and airbrushed. Accuracy wasn’t important as decals would cover the edges, but this meant no gaps could be present.
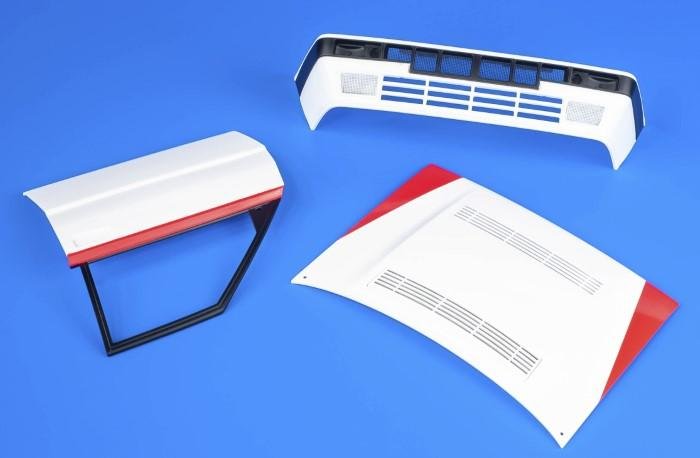
Above: The bonnet and doors also had red areas that had to be painted and there was a surprising amount of black trim to be added to the bumpers, window frames, door surrounds and roof drip rails.
Work then began on the propshaft and rear differential. The latter fits inside a protective cage carrying the suspension mountings, thus the uprights for the cushioning system had to be completed. Much neatening, building into sub-assemblies and painting was required before the rear transmission could be fitted. Quite a few of the suspension parts are screwed into position, partly for strength and partly for a workable arrangement – sprung dampers are supplied, which work if assembled carefully. On the real car, constant velocity joints would allow the suspension to move and still transmit drive to the wheels; on the model, these are represented by rubber cones that actually work quite effectively. The instructions are not particularly clear on the orientation of the suspension arms, thus care was required to ensure all were fitted correctly – so as not to bind – and allow the suspension to move freely. Similarly, the brake discs and callipers must be attached to the uprights carefully to prevent rubbing that would remove paint.
The front suspension was similar job, with just additional pickups for the steering. Overall fit was very good so everything aligned correctly and sat properly with the wheels. The only problem area was connecting the droplinks on the anti-roll bars – the rear was very tight and fitting broke one of the mountings, while the front was rather sloppy and kept popping apart. Test-fitting the body showed a problem: the car’s track was too wide at the front and rear – at the back, the wheels actually hit the top of the wings if the suspension was compressed. A photo of an assembled model in the instructions exhibits the same issue, so it wasn’t a build problem, and there’s no room for adjusting the suspension. The issue seems to be the kit’s wheels, which scale to 17in 9.5J sizing, whereas references show 16in 7J examples were usually used on tarmac – this equates to slightly more than 5mm difference in 1/12 scale. Such units would mean the wheels fitted correctly – I have seen one of these kits built with 3D-printed wheels of the correct size that looked so much better. Fortunately, the rims are held by screws, so if aftermarket replacements become available, they can be substituted easily. By this point, the build had taken almost six months, so it was a big occasion when I was able to finally install the engine and connect the exhaust, transmission and pipework. Adding the radiator and the oil cooler meant the chassis was complete.
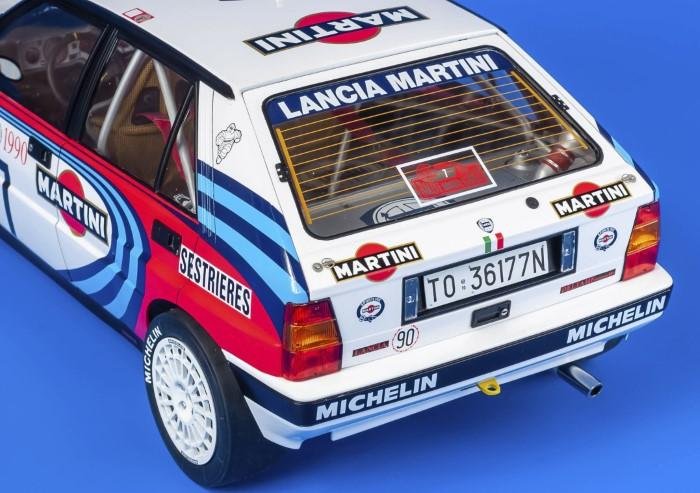
Above: Decals were demanding to apply. Notably, care was required to align the blue stripes on the front and rear wings with the doors and bonnet.

Above: After the windows were fitted in the doors, a glue line visible on the inside was masked and painted black to give a neat finish both inside and out.
To the body shop!
Italeri’s bodyshell is one huge moulding, but it’s important to mention that test-fitting the doors revealed they didn’t fit very well unless the frame was fitted over the chassis, spreading it to the correct shape. The fit of the opening parts on the finished model is excellent, with no adjustment necessary. After neatening the body parts, minor assembly was required to attach the hinge posts for the front doors before paint. Mr. Surfacer 1000 White was followed by several coats of LP-2 White, each flatted with 6,000- and 8,000-grade micro-mesh.
The instructions contain paper templates to apply the red areas for the Martini sponsor markings – on either side are large two-tone blue decals, so the colour had to reach into these to avoid gaps. The rest of the bodyshell was then masked so that the white was protected – the inside (doors, their shuts, bonnet and tailgate) could thus receive aluminium. While Tamiya’s X-7 Red is suggested, LP-50 Bright Red was a better match with the Martini logos – coverage was excellent and two coats were applied and flatted in between. Black came next – the roof edges, tops of doors and window surrounds received LP-5 Semi Gloss Black. Masking was now removed and it was time to tackle the decals.
Above: This is the fully completed chassis, with just a fuel filter and the bodywork remaining to be attached.
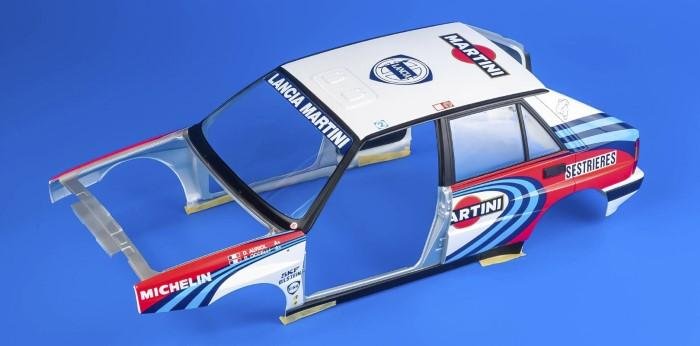
Above: The main shell was ready with windows and inner trim attached and just the tailgate, bonnet and doors separate.
Applying the markings is another major job as there are lots of them and some are very large. The best place to start was with the doors as this determined the position of the front and rear decals. The instructions are not very clear on how the items fit – particularly how high up on the door – so positioning is critical for markings to align correctly. The correct position is to line the fine blue pinstripe along the top swaging of the door, where it bends flat to the base of the window (see photos). The whole decal then angles down very slightly, as shown where it runs across the door handle. The bodyshell had to be fitted and doors taped in position to apply the markings.
Copious quantities of setting solutions were used to ensure the decals conformed. They took several days to apply, yet the fit was impressive, particularly the stripes. There were small places where touch-ups were required and Humbrol 104 Blue was a perfect match for the dark hue, while X-2 White and X-14 Sky Blue could be mixed for the light shade. Body parts then received coats of Mr. Color GX112 UV Cut Gloss Varnish, again flatted between layers with a final application of Tamiya Polishing Compounds for a mirror finish.
Stage finish
The model was now starting to take shape, but the finish meant it was becoming increasingly difficult to work with the parts. Fitting the windows was nerve-wracking, but went surprisingly well – the side windows caused the only real problem as they wouldn't fit, but a minor scalpel scrape and paint touch-up solved the issue. Internal faces were then masked to paint the areas of the inside of the window frames in black. On the tailgate, the inner edge of the rear window’s rubber seal was also painted black, which helped disguise the glue join.
The front bumper had to be assembled into a unit carrying the radiator grille and lights – the last of these must be assembled carefully to avoid any glue marks, so Johnson’s Klear was used to bond the lenses to the housings. Fitting the light units to the grille is not clearly shown in the instructions, but be aware that the flat sides have to face each other. Also pay attention to the position of the lenses – the instructions show them fitted the wrong way up on one side. Really tricky jobs now followed. The tailgate and bonnet had to be attached and the positioning was vague in the instructions, so they were glued and the covers left closed while the hinges were set. The doors fitted easily once an opening for the locating pin was cleaned on the body – they were also closed while the glue cured, with masking tape applied across painted areas to avoid any slippage and panel gaps.
Above: Lights were added using Johnson’s Klear. Chrome reflectors for indicators and reversing lights were added with a 1mm Molotow Liquid Chrome pen.
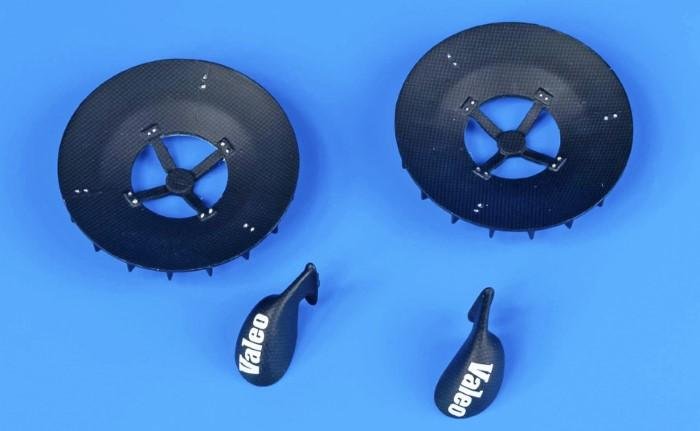
Above: Front wheel brake fans and the wing mirrors had to be covered in carbon fibre decal. Again, Tamiya markings were used as none were supplied.
Above: Smaller details included PE retaining fittings on the windscreen and rear window. A plastic tailpipe was replaced with a length of 5mm stainless steel tube.
With the bonnet fitted, the completed front bumper could be attached to the lower edge of the front wings, but care had to be taken to prevent damage. Adding to the difficulty, the decals prevent tape support, so the best solution is to rest the bumper on two paint bottles, thus allowing the weight of the model to press the sections together. Wing mirrors and brake fans (which fit the front wheels) had to be covered in carbon fibre decals and varnished. Other small jobs left to complete the model included fitting the indicator lights, windscreen wipers and so on – finishing these small jobs took much longer than expected.
Finally, after nine months, attaching the roof aerial was the very last job and the model was complete… except no suitable tubing has been found to replace what was supplied for the front brake ducts, plus the horrible chrome cut-off button near the wipers wasn’t fitted in want of replacement. Ditto the PE mudflaps, as these appeared unconvincing – front examples were not always fitted, while pewter sheet can be used for a rear set.
Above: Bonnet pins are difficult to fold, but spares are supplied. The front bumper is hard to fit along the bottom of the front wings.
Rally result
This is a big, expensive kit, which was a lot of work but I really enjoyed building it. There are issues – notably the wheels – for which there are currently no easy solutions. In my view, the kit-supplied detailing parts are inadequate – I replaced almost all of them and added many more. There are also many ejector-pin marks, often in awkward places, some parts are unusable, such as the instrument dial covers. That said, the overall fit is very good, particularly the doors, tailgate and bonnet, which are important for the final appearance. Ultimately it’s a huge amount of work but also massively rewarding.