

Introduction: How to Build a Wood Paddle Board


Why build a wooden SUP?
Paddle boarding is inherently a very clean activity but when you consider the harmful chemicals, overseas manufacturing, and short lifespan of foam paddleboards, things look quite different. For a long time I have lived with the idea that recycling isn’t the answer to our society’s constant use of the planets resources so paddling on a foam board made about as much sense to me as eating on styrofoam plates.
Building your own wooden SUP offers an alternative that is both environmentally responsible, longer lasting, and the finished boards look great with timeless style. Wood boards look a harder to build than they really are; more challenging than assembling an IKEA dresser but easier than building a wooden canoe or kayak. The project is completed in many small steps making it easy to fit in with life's other responsibilities. (Wife, kids, employment, etc..) If you start with a CNC fishbone frame you should be done in about 40 hours.
Step 1: Bottom Panel


Bottom Panel
One of the really cool parts about building a paddle board is the top and bottom panels can be built as large flat panels. Two flat book-matched panels are built and then bent over a series of risers that exactly match the rocker and contours of the finished board. If you have build a wooden kayak or canoe by adding one 3/4" strips at a time you will really appreciate starting with a single 30" wide piece.
Step 2: Fishbone Frame

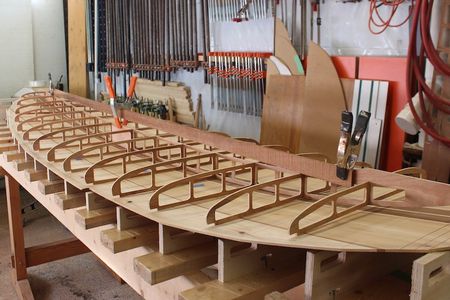

The internal fishbone frame is the skeleton that replaces the traditional foam core usually found in paddle boards. You can build your own fishbone using paper plans but using a CNC paddleboard kit saves a ton of fiddly work that doesn't show on the finished board.
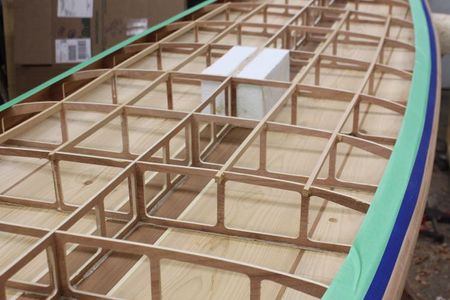
Step 3: Rocker Table


A rocker table is used to set both the boards rocker and the bottom contours. Paddleboards have a lot of subtle engineering going on under the board that the rocker table presses into the finished board. Wooden boards shapes are designed first on a computer and then jigs are used to ensure the correct shape is achieved. The combination of using thin panels sandwiched between matching forms allows very complex shapes without the need for steam.
Step 4: Bead & Cove Rails


The SUP's rails are built by stacking 1/4" x 3/8" bead & cove strips one at a time. These narrow bead & cove strips have many benefits over boards built with solid rails. The first is the individual narrow strips are easy to bend and usually the only the first few require any steaming. A cloths iron provides enough steam in about 1 minute and laminating many narrow strips is both easier and more stable than forcing a single piece into position. Since the boards shape is defined by the internal fishbone frame DIY builders do not have to know how to properly shape the boards rails to achieve the correct shape. The outer skins thickness is never thicker than 1/4" thick resulting in a board that ends up weighing only 10 percent heavier than a quality foam board.
Step 5: Internal Blocking


With the bead & cove rails complete it is time to cut off the nose and tail sections for solid blocking. The solid blocking saves you from having to steam bend tight radius curves and it adds ascetically pleasing transitions at the nose and tail. Blocking is also added to support the fin box, SUP handle, leash cup and vent before the top panel is added. The internal blocking can be made from recycled foam (pictured) or solid wood blocks.
Step 6: Attaching the Top Panel


The next step in building a hollow wooden SUP is attaching the top panel. As a professional builder, I have a lot of clamps but you do not need walls of clamps to do this step. The clamps pictured are being used to hold strong-back in position but webbing straps or string can also be used. Wooden door wedges do the real clamping and allow you to curve the deck by pressing against the strong-back. After the top is attached the excess material is removed with a drawknife and spokeshave and the rails are given a final shaping.
Step 7: Sanding

The last step before glassing is to sand the entire board. I hated sanding when I started woodworking because I would grab an orbital sander with 220-grit and it would take forever to get the desired results. I now start with largest sander practical for the job and use a coarser grit like 80 to fair and flatten the project. Once everything is fair/flat you can start working your way through the finer grits: 100, 150, 220 and you finish with better results in a fraction of the time.
Step 8: Glassing


Glassing a wood paddle board can be a bit intimidating if you haven't worked with fibreglass and epoxy before but it is really quite simple. The basic steps are you laminate the board, do a hot coat to fill the weave of the cloth and then finish with a gloss coat to make the board shiny. The individual steps are covered in much greater detail in free tutorials on my website: how to build a wood paddle board. In a society where everything seems to be disposable, it's awesome building something that will never go out of style or need replacing. Using your handcrafted paddle board promises simple joy and happiness for a lifetime.


